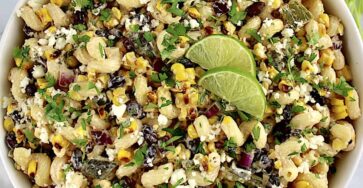
Zucchini Walnut Pancakes.

Ingredients:

  • 1 cup grated zucchini (about 1 small to medium zucchini)
  • 1 cup all-purpose flour (or whole wheat flour)
  • 1 tbsp sugar
  • 1 tsp baking powder
  • ¼ tsp baking soda
  • ¼ tsp cinnamon (optional, for a warm flavor)
  • ¼ tsp salt
  • 1 large egg
  • ¾ cup milk (dairy or non-dairy)
  • 1 tsp vanilla extract
  • 2 tbsp melted butter or vegetable oil
  • ⅓ cup chopped walnuts (plus extra for garnish)
  • Butter or oil for cooking

Instructions:

1. Prepare the zucchini:

  • Grate the zucchini using a box grater and place it in a clean kitchen towel or paper towel. Squeeze out as much excess moisture as possible and set aside.

2. Mix the dry ingredients:

  • In a large bowl, whisk together the flour, sugar, baking powder, baking soda, cinnamon (if using), and salt.

3. Mix the wet ingredients:

  • In a separate bowl, whisk the egg, milk, vanilla extract, and melted butter (or oil) until smooth.

4. Combine the wet and dry ingredients:

  1. Pour the wet mixture into the dry ingredients and stir until just combined. Be careful not to overmix; the batter will be slightly lumpy.
  2. Gently fold in the grated zucchini and chopped walnuts.

5. Cook the pancakes:

  1. Heat a non-stick skillet or griddle over medium heat and lightly grease with butter or oil.
  2. Pour about ¼ cup of batter onto the skillet for each pancake. Cook for 2-3 minutes, or until bubbles form on the surface and the edges look set.
  3. Flip the pancakes and cook for another 1-2 minutes, until golden brown and cooked through.
  4. Repeat with the remaining batter, greasing the pan as needed.

6. Serve:

  • Serve the Zucchini Walnut Pancakes warm with your favorite toppings such as maple syrup, yogurt, extra walnuts, or fresh fruit.

Enjoy!

These Zucchini Walnut Pancakes are light, fluffy, and packed with wholesome ingredients, making them a perfect breakfast or brunch option. The zucchini adds moisture, while the walnuts give a delightful crunch.

Funfetti Pancakes.

Ingredients:

For the pancakes:

  • 1 ½ cups all-purpose flour
  • 2 tbsp sugar
  • 2 tsp baking powder
  • ¼ tsp baking soda
  • ¼ tsp salt
  • 1 cup buttermilk (or regular milk with 1 tbsp lemon juice or vinegar)
  • 1 tsp vanilla extract
  • 1 large egg
  • 2 tbsp melted butter
  • ¼ cup rainbow sprinkles (plus more for topping)

For the topping (optional):

  • Whipped cream
  • Extra sprinkles
  • Maple syrup
  • Powdered sugar

Instructions:

1. Mix the dry ingredients:

  1. In a large bowl, whisk together the flour, sugar, baking powder, baking soda, and salt.

2. Mix the wet ingredients:

  1. In another bowl, whisk together the buttermilk, egg, vanilla extract, and melted butter until smooth.

3. Combine the wet and dry ingredients:

  1. Pour the wet ingredients into the dry ingredients and stir gently until just combined. The batter will be slightly lumpy, which is okay. Be careful not to overmix.
  2. Gently fold in the rainbow sprinkles, being careful not to stir too much or the sprinkles may bleed into the batter.

4. Cook the pancakes:

  1. Heat a non-stick skillet or griddle over medium heat and lightly grease with butter or cooking spray.
  2. Pour about ¼ cup of batter onto the skillet for each pancake. Cook for 2-3 minutes until bubbles form on the surface and the edges look set.
  3. Flip the pancake and cook for another 1-2 minutes until golden brown and cooked through.
  4. Repeat with the remaining batter.

5. Serve:

  1. Stack the pancakes on a plate and top with whipped cream, more sprinkles, syrup, or any other toppings you like!

Enjoy your Funfetti Pancakes! These fluffy and colorful pancakes are sure to bring joy to your breakfast table, especially for a festive occasion.

Corn and Ricotta Bruschetta.

Ingredients:

  • 1 baguette or rustic bread, sliced into ½-inch slices
  • 1 cup ricotta cheese (fresh and creamy)
  • 1 ½ cups fresh or frozen corn kernels (if using fresh, cut from 2-3 ears of corn)
  • 2 tbsp olive oil, divided
  • 1 clove garlic, minced
  • 1 tbsp fresh basil or parsley, chopped (plus more for garnish)
  • 1 tsp lemon zest (optional, for brightness)
  • Salt and pepper, to taste
  • Honey or balsamic glaze (optional, for drizzling)

Instructions:

1. Toast the bread:

  1. Preheat your oven to 400°F (200°C).
  2. Place the bread slices on a baking sheet and brush both sides lightly with 1 tablespoon of olive oil.
  3. Toast the bread in the oven for 8-10 minutes, flipping halfway, until golden and crispy. Alternatively, you can toast them on a grill or stovetop griddle.

2. Prepare the corn:

  1. In a skillet, heat the remaining tablespoon of olive oil over medium heat.
  2. Add the corn kernels and sauté for 3-4 minutes, stirring occasionally, until they are slightly golden and tender.
  3. Add the minced garlic and cook for another minute, just until fragrant. Remove from heat.
  4. Stir in the chopped basil or parsley, lemon zest (if using), salt, and pepper. Set aside.

3. Assemble the bruschetta:

  1. Spread a generous layer of ricotta cheese on each toasted slice of bread.
  2. Top with the sautéed corn mixture, making sure each piece gets a nice, even amount of corn.

4. Garnish and serve:

  • Sprinkle with additional fresh herbs if desired, and drizzle with honey or balsamic glaze for an extra touch of sweetness or tang.

Enjoy your Corn and Ricotta Bruschetta! It’s a creamy, fresh, and savory dish with just the right amount of crunch, perfect for summer parties or casual gatherings.

Fried Mushrooms.

Ingredients:

  • 1 lb (450g) fresh mushrooms (button, cremini, or your choice), cleaned and trimmed
  • 1 cup all-purpose flour
  • 2 large eggs
  • 1 cup breadcrumbs (panko for extra crunch or regular breadcrumbs)
  • ½ cup grated Parmesan cheese (optional)
  • 1 tsp garlic powder
  • 1 tsp onion powder
  • Salt and pepper, to taste
  • Oil for frying (vegetable, canola, or olive oil)

Instructions:

1. Prepare the mushrooms:

  • Clean the mushrooms with a damp cloth or paper towel to remove any dirt. If using larger mushrooms, you can slice them into halves or quarters.

2. Set up the breading station:

  1. In one shallow bowl, place the flour and season it with salt, pepper, garlic powder, and onion powder.
  2. In a second shallow bowl, beat the eggs.
  3. In a third shallow bowl, combine the breadcrumbs and grated Parmesan cheese (if using).

3. Bread the mushrooms:

  1. Dip each mushroom into the flour mixture, coating it evenly. Shake off any excess flour.
  2. Next, dip it into the beaten eggs, allowing any excess to drip off.
  3. Finally, coat the mushroom in the breadcrumb mixture, pressing gently to ensure the breadcrumbs adhere well.

4. Heat the oil:

  • In a deep skillet or frying pan, heat about ½ inch of oil over medium heat until hot (around 350°F or 175°C). You can test if the oil is ready by dropping in a small piece of bread; it should sizzle and turn golden brown.

5. Fry the mushrooms:

  1. Carefully add the breaded mushrooms to the hot oil in batches, being careful not to overcrowd the pan.
  2. Fry for about 3-4 minutes, or until golden brown and crispy, turning occasionally for even cooking.
  3. Remove the fried mushrooms with a slotted spoon and transfer them to a plate lined with paper towels to drain excess oil.

6. Serve:

  • Season with additional salt if desired, and serve hot with your favorite dipping sauces, such as ranch dressing, marinara, or aioli.

Enjoy!

These Fried Mushrooms are crispy on the outside and tender on the inside, making them a delightful snack or appetizer!

Homemade Bagel Dogs Recipe.

Ingredients:

For the bagel dough:

  • 3 ½ cups all-purpose flour
  • 1 tbsp sugar
  • 2 tsp salt
  • 1 packet (2 ¼ tsp) active dry yeast
  • 1 ¼ cups warm water (110°F)
  • 1 tbsp olive oil

For the filling:

  • 8 hot dogs (beef, pork, or turkey)
  • 1 egg, beaten (for egg wash)
  • Sesame seeds, poppy seeds, or everything bagel seasoning (optional, for garnish)

For boiling the bagels:

  • 6 cups water
  • 2 tbsp baking soda

Instructions:

1. Make the dough:

  1. In a small bowl, mix the warm water with the yeast and sugar. Let it sit for 5-10 minutes until frothy.
  2. In a large bowl, combine flour and salt. Add the yeast mixture and olive oil, and mix until the dough comes together.
  3. Turn the dough onto a lightly floured surface and knead for 8-10 minutes until smooth and elastic.
  4. Place the dough in a greased bowl, cover with a damp towel, and let it rise in a warm spot for 1-1.5 hours, or until doubled in size.

2. Preheat the oven:

  • Preheat your oven to 400°F (200°C) and line a baking sheet with parchment paper.

3. Prepare the bagel dogs:

  1. Once the dough has risen, punch it down and divide it into 8 equal pieces.
  2. Roll each piece into a long rope, about 12-14 inches in length.
  3. Wrap the dough rope around each hot dog, starting from one end and spiraling around until the entire hot dog is covered. Pinch the dough at the ends to seal.

4. Boil the bagel dogs:

  1. Bring 6 cups of water to a boil in a large pot. Add the baking soda and stir to dissolve.
  2. Carefully drop the wrapped hot dogs into the boiling water, one or two at a time, and boil for 30 seconds. Remove with a slotted spoon and place them on the prepared baking sheet.

5. Bake:

  1. Brush each bagel dog with the beaten egg to give it a shiny finish.
  2. Sprinkle with sesame seeds, poppy seeds, or everything bagel seasoning if desired.
  3. Bake in the preheated oven for 15-20 minutes, or until the bagels are golden brown and firm to the touch.

6. Cool and serve:

  • Let the bagel dogs cool for a few minutes before serving.

Serving suggestions:

  • Serve with mustard, ketchup, or cheese sauce for dipping.

Enjoy your Homemade Bagel Dogs! They’re a fun, kid-friendly snack that’s also perfect for parties or a casual dinner.

Sausage Rolls.

Ingredients:

  • 1 lb (450g) sausage meat (or remove casing from 1 lb of your favorite sausages)
  • 1 sheet of puff pastry (thawed if frozen)
  • 1 small onion, finely chopped (optional)
  • 1 clove garlic, minced (optional)
  • 1 tsp fresh thyme or ½ tsp dried thyme
  • 1 tsp Dijon mustard (optional)
  • Salt and pepper, to taste
  • 1 egg, beaten (for egg wash)
  • Sesame seeds or poppy seeds (optional, for garnish)

Instructions:

1. Preheat the oven:

  • Preheat your oven to 400°F (200°C) and line a baking sheet with parchment paper.

2. Prepare the filling:

  1. In a bowl, mix the sausage meat with finely chopped onion, garlic, thyme, Dijon mustard, salt, and pepper. Combine until everything is evenly mixed. If you’re using sausage links, remove the casings first.

3. Prepare the puff pastry:

  1. Roll out the thawed puff pastry on a lightly floured surface into a rectangle, about 10×12 inches.
  2. Cut the pastry in half lengthwise to create two long strips.

4. Assemble the sausage rolls:

  1. Divide the sausage mixture into two portions and shape each into a long sausage log.
  2. Place each log along the center of each pastry strip.
  3. Brush the edges of the puff pastry with a little of the beaten egg.
  4. Fold the pastry over the sausage filling and press the edges together to seal, ensuring the seam is on the bottom.
  5. Cut each long roll into 2-3 inch pieces, depending on how big you want your sausage rolls.

5. Bake:

  1. Place the sausage rolls seam-side down on the prepared baking sheet.
  2. Brush the tops with the beaten egg to give them a golden finish.
  3. Sprinkle with sesame seeds or poppy seeds, if using.
  4. Bake in the preheated oven for 20-25 minutes, until the pastry is golden brown and puffed, and the sausage is cooked through.

6. Cool and serve:

  • Let the sausage rolls cool for a few minutes before serving.

Serving suggestions:

  • Serve with your favorite dipping sauces like mustard, ketchup, or a tangy chutney.

Enjoy your Sausage Rolls! They’re crispy, flaky, and full of savory goodness—perfect for any occasion.

Easy Sausage, Peppers, and Onions.

Ingredients:

  • 1 lb (450g) Italian sausage (mild or hot, depending on preference)
  • 1 red bell pepper, sliced
  • 1 green bell pepper, sliced
  • 1 yellow bell pepper, sliced (optional, for color)
  • 1 large onion, sliced
  • 2 tbsp olive oil
  • 2 cloves garlic, minced
  • ½ tsp dried oregano
  • ½ tsp dried basil
  • Salt and pepper, to taste
  • ¼ cup chicken broth (or water)
  • 2 tbsp tomato paste (optional, for a saucier dish)
  • 1 tsp red pepper flakes (optional, for heat)
  • Fresh parsley or basil, chopped (optional, for garnish)

Instructions:

1. Brown the sausages:

  1. Heat 1 tablespoon of olive oil in a large skillet over medium heat.
  2. Add the sausages and cook for 5-7 minutes, turning occasionally, until browned on all sides (they don’t have to be cooked through yet). Remove sausages from the pan and set aside.

2. Sauté the vegetables:

  1. In the same skillet, add the remaining tablespoon of olive oil.
  2. Add the sliced bell peppers and onion to the skillet and sauté for 5-7 minutes, stirring occasionally, until they begin to soften.
  3. Add the minced garlic, oregano, basil, salt, pepper, and optional red pepper flakes. Cook for another minute until fragrant.

3. Combine sausage and vegetables:

  1. Slice the browned sausages into 1-2 inch pieces (or keep them whole if you prefer).
  2. Add the sausage back into the skillet with the peppers and onions.
  3. Stir in the chicken broth (and tomato paste, if using) to deglaze the pan, scraping up any brown bits. Simmer everything together for 10-12 minutes, until the sausage is fully cooked and the vegetables are tender.

4. Garnish and serve:

  • Garnish with freshly chopped parsley or basil, if desired.

Serving suggestions:

  • Serve over rice, pasta, or polenta for a full meal.
  • Serve in a sandwich roll for a classic sausage and pepper sandwich.

Enjoy your Easy Sausage, Peppers, and Onions! It’s a simple and comforting dish that’s packed with flavor.

Sweet Potato and Yukon Gold Bake.

Ingredients:

  • 2 large sweet potatoes, peeled and thinly sliced
  • 2 large Yukon Gold potatoes, peeled and thinly sliced
  • 1 small onion, thinly sliced (optional)
  • 2 cups heavy cream (or half-and-half for a lighter version)
  • 2 cloves garlic, minced
  • 1 tsp fresh thyme (or ½ tsp dried thyme)
  • 1 tsp fresh rosemary, finely chopped (or ½ tsp dried rosemary)
  • 1 cup shredded Gruyère or cheddar cheese
  • ½ cup grated Parmesan cheese
  • Salt and pepper, to taste
  • 2 tbsp unsalted butter, cut into small pieces
  • Fresh parsley, chopped, for garnish (optional)

Instructions:

1. Preheat the oven:

  • Preheat your oven to 375°F (190°C) and lightly grease a 9×13-inch baking dish.

2. Prepare the potatoes:

  • Peel and thinly slice the sweet potatoes and Yukon Gold potatoes to about ⅛-inch thick slices. You can use a mandoline for more even slices if you have one.

3. Make the cream mixture:

  1. In a medium saucepan, heat the heavy cream (or half-and-half) over medium heat.
  2. Add the minced garlic, thyme, rosemary, salt, and pepper. Stir until the mixture is warm but not boiling. Remove from heat.

4. Layer the potatoes:

  1. In the greased baking dish, layer half of the Yukon Gold potatoes in an overlapping pattern. Sprinkle with salt and pepper.
  2. Add a layer of half of the sweet potatoes over the Yukon Gold potatoes, followed by a sprinkling of salt and pepper.
  3. If using onions, scatter the sliced onions evenly over the sweet potatoes.

5. Add cheese:

  • Sprinkle half of the Gruyère (or cheddar) and Parmesan cheese over the potato layers.

6. Repeat layering:

  1. Add another layer of the remaining Yukon Gold potatoes, then the remaining sweet potatoes.
  2. Pour the warm cream mixture evenly over the potatoes.
  3. Sprinkle the rest of the cheese on top and dot the surface with small pieces of butter.

7. Bake:

  • Cover the dish with aluminum foil and bake in the preheated oven for 40 minutes. Then remove the foil and bake for an additional 20-25 minutes until the top is golden and bubbly, and the potatoes are tender when pierced with a fork.

8. Garnish and serve:

  • Let the potato bake rest for 10 minutes before serving. Garnish with freshly chopped parsley if desired.

This Sweet Potato and Yukon Gold Bake is a perfect side dish for a holiday meal, or even as a comforting weeknight dinner paired with a salad or roasted vegetables!

Spanakopita.

Ingredients:

For the filling:

  • 1 lb (450g) fresh spinach (or 1 lb frozen spinach, thawed and drained)
  • 1 small onion, finely chopped
  • 2-3 green onions, finely sliced
  • 2 cloves garlic, minced
  • 2 tbsp olive oil
  • 8 oz (225g) feta cheese, crumbled
  • 2 large eggs, lightly beaten
  • 2 tbsp fresh dill, chopped (or 1 tsp dried dill)
  • 2 tbsp fresh parsley, chopped
  • Salt and pepper, to taste
  • ¼ tsp ground nutmeg (optional)

For the pastry:

  • 1 package phyllo dough (usually 16 oz or 454g), thawed
  • ½ cup (1 stick) melted butter or olive oil for brushing the dough

Instructions:

1. Prepare the filling:

  1. If using fresh spinach, wash and chop it, then wilt it in a pan over medium heat with a pinch of salt. Let it cool and squeeze out any excess liquid.
  2. In a large pan, heat olive oil over medium heat and sauté the onion and green onions until softened, about 5 minutes. Add the minced garlic and cook for another minute.
  3. Remove from heat and stir in the spinach, crumbled feta, beaten eggs, dill, parsley, nutmeg (if using), salt, and pepper. Mix well and set aside.

2. Preheat the oven:

  • Preheat your oven to 350°F (175°C).

3. Prepare the phyllo dough:

  1. Thaw the phyllo dough according to package instructions. Keep it covered with a damp kitchen towel to prevent it from drying out while you work.
  2. Lightly grease a 9×13-inch baking dish with butter or olive oil.

4. Assemble the spanakopita:

  1. Place one sheet of phyllo dough into the baking dish and brush it with melted butter or olive oil. Repeat this process, layering and brushing each sheet with butter or oil, until you have 6-8 layers.
  2. Spread the spinach and feta filling evenly over the phyllo layers.
  3. Continue layering phyllo sheets on top of the filling, brushing each with butter or oil. Add another 6-8 layers.
  4. Once all the phyllo is layered, use a sharp knife to lightly score the top layers into squares or triangles to make slicing easier after baking.

5. Bake the spanakopita:

  • Bake in the preheated oven for 45-50 minutes, or until the phyllo is golden and crisp.

6. Cool and serve:

  • Let the spanakopita cool for 10-15 minutes before slicing and serving.

Enjoy your Spanakopita! It’s delicious warm or at room temperature, making it great for a party, picnic, or family meal.

Cheesy Artichoke Pie.

Ingredients:

For the crust:

  • 1 ½ cups all-purpose flour
  • ½ cup cold unsalted butter, cut into small cubes
  • ½ tsp salt
  • 2-3 tbsp ice water

For the filling:

  • 1 (14 oz) can or jar of artichoke hearts, drained and chopped
  • 1 cup ricotta cheese
  • ½ cup grated Parmesan cheese
  • 1 cup shredded mozzarella cheese
  • 2 large eggs
  • 1 small onion, finely chopped
  • 2 cloves garlic, minced
  • 2 tbsp olive oil
  • 1 tbsp chopped fresh parsley (or 1 tsp dried)
  • 1 tsp dried oregano
  • Salt and pepper, to taste
  • ¼ tsp red pepper flakes (optional, for a little heat)

Instructions:

1. Prepare the crust:

  1. In a bowl or food processor, mix flour and salt.
  2. Add cold butter cubes, and pulse or cut in with a pastry cutter until the mixture looks like coarse crumbs.
  3. Add ice water, 1 tablespoon at a time, and mix until the dough just holds together.
  4. Form the dough into a disk, wrap in plastic, and chill for at least 30 minutes.

2. Sauté the onion and garlic:

  1. In a medium skillet, heat olive oil over medium heat.
  2. Add chopped onions and cook for 5-7 minutes, until soft and translucent.
  3. Add minced garlic and cook for another minute, until fragrant. Remove from heat and set aside.

3. Preheat the oven:

  • Preheat your oven to 375°F (190°C).

4. Make the filling:

  1. In a large bowl, combine the ricotta, Parmesan, and mozzarella cheeses.
  2. Stir in the eggs, sautéed onions and garlic, chopped artichoke hearts, parsley, oregano, salt, pepper, and optional red pepper flakes. Mix well until all ingredients are evenly incorporated.

5. Roll out the crust:

  1. Roll the chilled dough on a lightly floured surface until it’s about ¼ inch thick and large enough to fit a 9-inch pie or tart dish.
  2. Gently press the dough into the dish, trimming any excess from the edges.
  3. Poke the bottom of the crust with a fork a few times to prevent it from puffing up during baking.

6. Assemble and bake:

  1. Pour the artichoke and cheese filling into the prepared crust, spreading it evenly.
  2. Bake the pie for 35-40 minutes, until the top is golden and the filling is set.

7. Cool and serve:

  • Let the pie cool for 10 minutes before slicing. Serve warm or at room temperature.

Enjoy your Cheesy Artichoke Pie! It pairs wonderfully with a fresh salad or some crusty bread for a complete meal.